


Polyurea Koi Pond and Scenic Build
Dennis Davidson, North Lawrence, Ohio, constructed this entire polyurea project by himself.
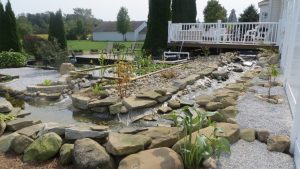
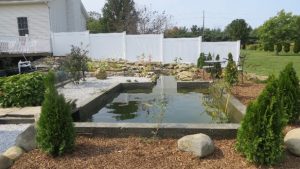
This project has created a peaceful get-away just outside the homeowners’ back door. In addition to providing a habitat for Koi, it has encouraged plants, birds, deer, and other wildlife to flourish, making each day an adventure. Read on to learn how this polyurea contractor/homeowner did this project himself.
About six years ago, I had an opportunity to buy the entire contents of a koi fishpond. I bought about 80 large koi, several tons of rocks, and dozens of plants. There was just one problem–I didn’t have anywhere to put the Koi long-term. I didn’t have a pond, so a needed to build one fast. First, I needed to find something to put the fish into before they arrived in just a few days, so I bought a 16 ft. swimming pool. This solved the Koi’s immediate need. The fish would be okay in the pool for a couple weeks while I constructed a pond. Fortunately, I happened to be a polyurea contractor and understood that using polyurea was the answer to my problem. I specialized in containment liner installation and knew how well polyurea worked to contain liquids and how strong and durable it is.
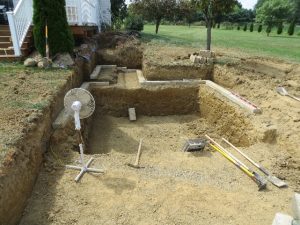
First, I had to dig the pond. Using my small backhoe, I dug a 14’ X 20’ hole with 6’ and 4’ depths. Around the perimeter of the pond, I dug a 16” ledge at about 4’ deep. Then, I laid a row of solid cement block on this ledge, and regular block wall the rest of the way up, until there was one row above ground level. Realistically, I should wait 28 days for the mortar to cure between the concrete before coating over it, but I didn’t have enough time. I would be in danger of losing some of the Koi if I didn’t act fast.

Since I have extensive experience with polyurea and fabric liners, I hatched a plan to speed up the process. Polyurea sticks to cement block very well, and the addition of the fabric would make it extremely resistant to tearing. I laid up all the blocks around the edge without any mortar at all, just loose laid and the bottom of the pond and lower walls were simply compacted dirt. I laid some non-woven geotextile fabric in the bottom and sprayed some polyurea to cover it–about 20-25 mils. to keep it in place. Then, I sprayed the cement block walls with about 15-20 mils. of polyurea and pressed the fabric into the wet coating before it set up. With about 60 seconds for the polyurea to dry, I could only do small sections at a time, making sure the polyurea would soak into the fabric. After I applied the first coat of polyurea, I sprayed another coat of polyurea (about 100 mils) on all surfaces.

The next morning, I did a thorough inspection of the liner, and started filling the pond with water. I was able to put the koi into the pond in just a few days once the water temperature and conditions were good. By using a polyurea liner, I was able to dig the pond and lay all the blocks in three days. I installed the liner in one day and wait two days for water conditions for a total of 6 days. And, on the seventh day, I rested! If I had used the standard block and mortar, with a concrete bottom, I would have needed about 35 to 40 days to complete the job. Also, the pond is for fish, so I would have needed to coat the cement and blocks anyway to compensate for the alkalinity of the cement, which is harmful to the fish.
This project was implemented 6 years ago. The Koi population has increased to about 150—a sign that the fish as doing well in their new habitat. Today, my Koi population is getting a little crowded, so last year I decided to build a second pond with a large bog filter area–a stream and a channel to connect with the original pond. I dug out a second pond measuring 11’ X 16’ and 5’ in depth. I made a ledge around the perimeter, like I had done on the first pond, then laid in four rows of cement block leaving the bottom as compacted dirt.
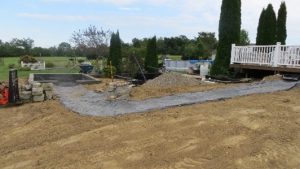
I build the bog filter system out of wood using treated 2X12’s for the sides and a compacted dirt bottom. When building the stream, I had to think outside the box. I couldn’t use concrete or blocks to form it. Again, I went back to my experience installing polyurea liners where there were no block walls. Instead, there was just dirt piled up around the tanks to contain any spills. These are called earthen wall containment or earthen berm walls. With this type of containment, we simply laid out the fabric and sprayed the polyurea coating right over the dirt. This gave me the idea of how to install the stream.
I dug out the stream by hand leaving different levels as I went to make areas of rolling water. The excess dirt was put along the stream to increase the height of the edges a little. At this time, I didn’t have any more fabric to lay on the dirt. After thinking about it for a while, my solution was to lay some 60 mil. plastic into the stream area and spray over that using it as a form. Now, I know that if I sprayed polyurea onto plastic the heat from the exothermic reaction of the polyurea will melt it. To solve this problem, I simply sprayed a very thin film of polyurea (about 10 mils.) over all the plastic. This wouldn’t heat up enough to melt the plastic, and it created a barrier on which to spray the rest of the 80 to 100 mils thickness of polyurea to that surface.
The two ponds, bog filter, and stream have been in use for one year, and everything is working as planned. No leaks!! I can’t think of any other system I could have used that would have been better given the short timeframe. I would like to add that I did these projects entirely by myself–without a crew. The system I used has worked for me for six years, and I would do this project the same way again.
A special thanks to Dennis Davidson, Mid America Coating Systems for submitting his story.
If you have a story to submit, send it to info@sprayfoaminsider.com
Editor: Jay Davidson